Potentiometer to Web
Hi all.. lets do another beautiful DIY...
Goal
To read voltage from a potentiometer in real-time and display in a web page dynamically.
So.. the goal seems completely dump and does no good job.But the learning curve involved will introduce into many Linux concepts, hardware setup, troubleshooting extents from micro-controller programs to html/php code.
Steps
1. Continuously read from analog input of Arduino where potentiometer is connected.
2. Send the value to Raspberry Pi via UART port.
3. Raspberry Pi reads the data and appends and writes it into a file.
4. Make an Apache server run in Raspberry Pi.
5. A combination of simple html file, a php code, and ajax script together does the job of
updating the webpage with latest value from file.
6. Forward the raspberry server to internet and watch the realtime variation of pot value in webpage.
Okie.. so lets get started...
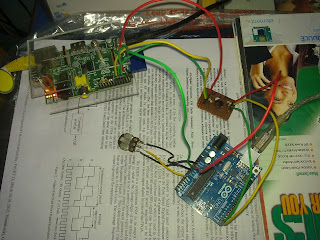
Hardware Setup..
Yep.. a Raspberry pi and Arduino UNO R3 connected over UART (serial) using a level shifter. A level shifter is neccessary since both boards operate at different output levels. (R pi at 3.3v and Arduino at 5v).
A 10k linear pot connected b/w 5v and ground. The central pin (wiper pin) of potentiometer is connected to analog input (A0) of Ardunio UNO R3.
Development Setup
So lets see the steps in details..
#include
const int led_read =13; // set an LED to indicate reading
int raw_value; // to hold raw value by analogRead() (0 - 1023)
float ana_data= 0.0; // to hold the analog value
void setup()
{
Serial.begin(9600); //set UART to 9600bps
pinMode(led_read,OUTPUT); // set OUTPUT pin for LED
}
void loop()
{
raw_value = analogRead(A0); // read analog input from A0 pin
ana_data = raw_value*(3.3/1023.0); // normalise to 5V
Serial.println(ana_data); // Write to UART port
digitalWrite(led_read,HIGH); // LED lit up
delay(500); // keep LED on
digitalWrite(led_read,LOW); // LED turn off
delay(500); // delay before next Read loop
}
# Program to read from serial port and append to a file
import serial
ser = serial.Serial('/dev/ttyAMA0',9600) # ttyAMA0 is the Arduino UART
try:
while 1:
data=ser.readline() #read from UART
print "voltage:",data # print the read value
f=open('test_log.txt','a') # open a file in append mode
f.write(str(data)) # write value to file
f.close() # close file
except KeyboardInterrupt:
print "\ndone"
ser.close()
Save it as a python file.(here uart_read.py)
The above code can be run using below command with sudo power since it is accessing serial hardware.
pi@raspberrypi ~ $ sudo python uart_read.py
Goal
To read voltage from a potentiometer in real-time and display in a web page dynamically.
So.. the goal seems completely dump and does no good job.But the learning curve involved will introduce into many Linux concepts, hardware setup, troubleshooting extents from micro-controller programs to html/php code.
Steps
1. Continuously read from analog input of Arduino where potentiometer is connected.
2. Send the value to Raspberry Pi via UART port.
3. Raspberry Pi reads the data and appends and writes it into a file.
4. Make an Apache server run in Raspberry Pi.
5. A combination of simple html file, a php code, and ajax script together does the job of
updating the webpage with latest value from file.
6. Forward the raspberry server to internet and watch the realtime variation of pot value in webpage.
Okie.. so lets get started...
Hardware Setup..
Yep.. a Raspberry pi and Arduino UNO R3 connected over UART (serial) using a level shifter. A level shifter is neccessary since both boards operate at different output levels. (R pi at 3.3v and Arduino at 5v).
A 10k linear pot connected b/w 5v and ground. The central pin (wiper pin) of potentiometer is connected to analog input (A0) of Ardunio UNO R3.

Development Setup
1. Arduino connected to Ubuntu PC and powered via USB with Arduino Sketch IDE running on PC.
2. Raspberry Pi also powered via micro USB from PC. Pi is also connected to home router via Ethernet. SSH is used to access Pi from Ubuntu PC. No GUI is used.
So lets see the steps in details..
Below code reads the analog input pin 'A0' of arduino and converts it to a voltage value and send it over UART to Raspberry Pi. Burn it to arduino from Sketch IDE
#include
const int led_read =13; // set an LED to indicate reading
int raw_value; // to hold raw value by analogRead() (0 - 1023)
float ana_data= 0.0; // to hold the analog value
void setup()
{
Serial.begin(9600); //set UART to 9600bps
pinMode(led_read,OUTPUT); // set OUTPUT pin for LED
}
void loop()
{
raw_value = analogRead(A0); // read analog input from A0 pin
ana_data = raw_value*(3.3/1023.0); // normalise to 5V
Serial.println(ana_data); // Write to UART port
digitalWrite(led_read,HIGH); // LED lit up
delay(500); // keep LED on
digitalWrite(led_read,LOW); // LED turn off
delay(500); // delay before next Read loop
}
At Raspberry pi we use a small python program to read data from UART and append it to a file named 'test_log.txt'. Below shown is the code.
# Program to read from serial port and append to a file
import serial
ser = serial.Serial('/dev/ttyAMA0',9600) # ttyAMA0 is the Arduino UART
try:
while 1:
data=ser.readline() #read from UART
print "voltage:",data # print the read value
f=open('test_log.txt','a') # open a file in append mode
f.write(str(data)) # write value to file
f.close() # close file
except KeyboardInterrupt:
print "\ndone"
ser.close()
Save it as a python file.(here uart_read.py)
The above code can be run using below command with sudo power since it is accessing serial hardware.
pi@raspberrypi ~ $ sudo python uart_read.py
Next step is to install a web-server in R pi. Any web-server should work for us. I have used a LAMP server. Lot of light weight options than apache are there. Guide to set up LAMP in R pi is pretty lengthy to be included here, so do a google search and find it. After succesfull installation you should be able to see a sample webpage at raspberry's ip. See it from your PC's browser by typing R pi's IP.
Now a simple html file with a php program to read from test_log.txt will do the real time updation of voltage value in webpage.
Click here to download the html, php and script files and copy them to root folder of your webserver. /var/www is the default for Apache.
Now modify the readfile.php with correct path for 'test_log.txt'. Then create a link to the readfile.html from the index page of Apache server using html link creation tag
Now refresh the web-page from PC's browser. Go to the readfile.html link and see the potentiometer value there. Now manually rotate pot and see the value change in the web-page... Voila....
Now what remains is making your server public, so that a remote friend can browse your webpage through internet and see the updating values. For that u will have to port forward the raspberry webserver's IP and port to your routers IP. In most cases your ISP will assign dynamic IP to your router while tries to connect to internet. So each time your router IP will be different. More details on how to port forward can be found by searching router make&model in google. i am using a D-link ADSL modem+router which has very simple settings.
So final output could be somewhat like shown below.. I will try to upload a video soon...


Comments